Thursday, May 24, 2012

How to Add Buttons As You Knit

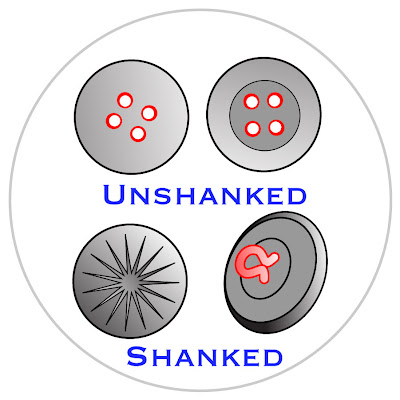
I don't remember where I got this idea. I don't think it came from my own brain, but I'm not sure who properly deserves credit. Oh, well. The gist of it is this: I'm lazy. I don't like sewing on buttons, because it means more ends to weave in. So, for this cardigan I'm knitting, I decided to try adding the buttons as I went.  Note: this will only work for buttons with a shank or two holes. Buttons with four holes cannot be knitted in this way. Well, you could actually add them this way, but they would look funny. You'll see what I mean.


Here's how I did it:
You'll need:

  • Knitting-in-progress to which button is to be added
  • Button(s)
  • A tapestry needle small enough to go through the hole(s) in your button(s)
  • Floss or thread


First, work up to the point that it's time to add a button. Where's that? You'll have to figure that part out yourself. As a general guide, I'd recommend basing it on the pattern's placement of the buttonholes. Once you've decided where, work up to the stitch you want to use to anchor the button. Make sure you are on a right side row, unless you like buttons facing inward. Come to think of it, there may be situations where you want a button on the wrong side, but that's certainly not the norm!

Next, thread a needle with thread of your choice. I used a snippet of dental floss.

Using the needle, pull the floss or thread through the stitch (direction doesn't really matter).

Then, thread the other end of the floss or thread through the needle. Now, you've got the needle pulling the thread, which pulls the stitch. Slip the stitch off the left knitting needle.


Push the tapestry needle through the button shank if you have a shanked button, or from back to front if you have a two-holed button, and pull the thread, then the stitch, through as well.


If you have a two-holed button, you must then repeat this going from front to back through the other hole. Now your button is on the stitch!


Place the stitch back on the left needle, then knit that stitch through the back loop. (Technically, it doesn't matter whether you knit it through the front or back loop, since the button compresses the stitch to the point you can't really tell anyway, but I found it much easier to knit it through the back loop.)


Voila! You have knitted in a button.


Monday, May 7, 2012

My First Trip to Knitting Camp

Never having been to knitting camp before, I was not sure it would be worth the money. But I figured, the price was not much more than I would pay for that many nights' lodging in a comfortable hotel, and I would be surrounded by knitters instead of screaming children, so what was there to lose? As it turns out, I very much underestimated the camp experience.

I had been to innumerable knit nights, to trunk shows, to fiber festivals, to Stitches and to knitting weekends with my buddies, but CampKIP was something else entirely, combining the best (in my humble opinion) features of all of these things into 4 too-short days of pure fiber bliss.

Like a knit-in, camp involved a good-sized group of knitters staying overnight in a retreat atmosphere. But, it was better, because it was more than one night long.

Like a trunk show, there were handknits on display everywhere. But it was better, because there were more of them, by a wide variety of designers and knitted by all the various camp attendees.

Like a fiber festival or Stitches, there was yarn and fiber for sale, and door prizes and raffles. But camp was better because the group was smaller, odds of winning were better, and the vending was not so overwhelming.

There were dozens of knitters from all over the country. We all stayed 3 nights at a retreat, where fabulous meals were provided. Everyone showed off their WIPs and FOs. Lots of people brought spinning supplies (including wheels!) and spun. People shared equipment, like their spinning wheels, yarn winders, scales and swifts, even a drum carder! People gave each other impromptu lessons on all kinds of techniques. Each evening, there was a raffle of 15-20 door prizes. There was a scavenger hunt for additional raffle tickets and prizes. There was a bonfire at which marshmallows were roasted and  s'mores were made. For those willing to pay a bit extra, massages, a wine tasting and a beer tasting were available. On vendor day, sumptuous yarns, luscious fiber, and useful equipment were sold.

It was a yarn fanatic's paradise, I tell you! If you ever get the chance to go to a knitting camp or retreat, drop everything and GO!

Thursday, March 29, 2012

Diagnosis: Stashitis. Prognosis: Grim.

Stashitis: inflammation of the stash.

I might have too much yarn. Knitters who read this will know that there is no such thing. But non-knitters, such as my husband, are fond of pointing out that a person who acquires yarn faster than she can knit it, who runs out of storage space for said yarn, or who isn't even sure where all the yarn is, has a problem.

I call this problem stashitis. My stash is inflamed. It has swollen to the point of causing problems.

So, how does one treat stashitis? The surgical option, stashectomy, is just too painful to contemplate. Besides, it might be life-threatening. How can a knitter live without a stash? But the lifestyle treatment is very difficult indeed: a yarn diet. One must knit more yarn than she takes in, and continue to do so for months, even years, until the stash shrinks to a manageable level. This can have side effects.

Queueitis: inflammation of the queue.

As I try to come up with projects for all the yarn in my stash, I notice that my Ravelry queue is lengthening. I am spending valuable free time, potential knitting time, browsing for just the right pattern, and adding patterns to my queue and my library.

And how does one treat queueitis? Assuming for the moment that stashectomy is still not a consideration, there is only one treatment. Casting on. Start the queued projects. This leads inevitably to...

WIPitis: inflammation of the WIPs (works in progress).

Alas, I have a rule about WIPs. To prevent myself from developing WIPitis, which I recognize as a very real danger to me, I have a rule (okay, more like a guideline, but I really do generally stick to it) that I may not have more than two WIPs at a time. Once I have started two projects, I must finish one before I can start something new.

So, I have stashitis, which leads to queueitis, and I have the Two-WIPs-at-a-time rule to prevent WIPitis. Stashectomy is too painful to contemplate. I haven't got enough self-control to stick to a yarn diet. There is only one cure.

KNIT FASTER!

Wednesday, March 14, 2012

On knowing when to let go

I don't frog often. I tink a lot, and I correct a lot of mistakes in various other ways, but I rarely frog. I especially hate completely unraveling an entire project. So when I have a project that clearly won't work out and needs frogging, I have to prepare myself first. I go through a mourning period for the item I had imagined, but that will never take shape. I hope I'm not the only crafter who does this.

I recently frogged my Bex socks. The pattern, by Cookie A, is lovely, with complicated, symmetrical cables that form a diamond-like pattern with ribs of varying widths. Most of the cabling is not very difficult, although there is one complex cable I ran across.

But, for whatever reason, I just didn't enjoy knitting it. The cables are on every single row, which means the progress is especially slow. In the end, I decided the finished socks wouldn't justify the frustration I was experiencing.

So, after about 10 days' mourning, prayer, fasting and soul-searching (okay, I exaggerate, but there really was mourning and soul-searching involved), I declared the socks beyond hope of recovery. I unplugged the needles, removing them slowly and with a heavy heart. Then, I watched as, stitch by stitch, my hands unraveled my work and wound it back into balls of yarn. Unraveling the cast-on was like seeing my project take its last breath. It was sad, but I knew the yarn was in a better place, ready to become something else, something that would inspire joy.

I am at peace with it.

Saturday, February 18, 2012

I Made Yarn!

I have wanted to learn to spin almost since I first learned to knit. It was an idea I toyed with for several years. I'm not entirely sure when I got serious about it. Perhaps it was when I saw the book "Respect the Spindle." That book planted the idea in my brain that I might be able to learn to spin without investing a small fortune in a spinning wheel. I could get a spindle, some fiber, and a book or a lesson, and for under $100, I could give it a try.

Still, it took the right atmosphere for me to take the plunge. A weekend knitting retreat with my favorite fiber fanatics, a trip with a feel that combined adventure and indulgence, set the mood I needed. When we found a yarn shop that specialized in spinning supplies, it seemed like a sign. I bought the supplies and the book. The shop owner gave me my first brief lesson in spinning, and I ran with it.

Like any newly acquired skill, spinning felt awkward at first. I wasn't sure how to get the spindle spinning and keep it moving. I didn't know what to do with my hands and the fiber. I kept at it, figuring that, like knitting, my body would figure it out eventually. My first spun single is not consistent in diameter. It has some "slubs" in it. It took me darned near 3 months to spin in. The second one is much more consistent and didn't take quite so long. Still, I wasn't exactly impressed with my skill. Neither of these singles looked like something I would want to knit.

Then, I plied the two singles together, and it was like magic or a chemical reaction: I got a product that was completely different from the input. I got a yarn that actually looks pretty nice, feels pretty strong, and that I am excited about dyeing and knitting up!

Two more miracles and I can apply for sainthood.

Sunday, January 22, 2012

A New Technique: Learning Double Knitting

It's been a while since I really learned a new knitting technique. Lately most of my "adventures" have involved using techniques I already know in different ways. And, to be perfectly honest, a lot my recent knitting hasn't been particularly adventurous. It's been practical. I recently moved to a colder city, and I've felt the need to knit useful items for myself and my children.

One of the lovely things about knitting is that it can be practical and fun at the same time. Right now, double knitting is both for me. It is practical because double-knit items are very warm, having two layers of knitted fabric. It is fun because it is new to me and because it can create endless interesting patterns.

In case you are wondering what double knitting is, I'll try to explain. Double knitting involves working with two strands of yarn (usually of different colors) in a manner that creates a two-sided, reversible fabric. One strand is knitted, creating the front, and the other strand is purled, creating the back. If you swap the two strands, you'll get a stitch of the opposite color. By doing this in pattern, you end up with a reversible fabric, with the same pattern in opposite colors. There are many helpful videos available.

As I usually do when learning a new technique, I started with a small project: a cell phone case. If this works well, I'll probably try something a little larger for my next double knitting attempt, maybe mittens or a hat. Now that I live someplace with real winters, those would be very handy!